使用terraform批量导入靶场到esxi
使用terraform批量导入靶场到esxi 前言
新建用户
terraform吧。terraform用户。[root@localhost:~] esxcli system account list
User ID Description Shell access
------- ------------------------------------------- ------------
root Administrator true
dcui DCUI User true
vpxuser VMware VirtualCenter administration account true
terraform用户,密码随机生成的jbDmE#^*9aCXUR,描述是terraform bot,再列举一下用户可以看到已经新建成功。[root@localhost:~] esxcli system account add -i terraform -p "jbDmE#^*9aCXUR" -c "jbDmE#^*9aCXUR" -d "terraform bot"
[root@localhost:~] esxcli system account list
User ID Description Shell access
--------- ------------------------------------------- ------------
root Administrator true
dcui DCUI User true
vpxuser VMware VirtualCenter administration account true
terraform terraform bot true
➜  ~ ssh -v [email protected]
([email protected]) Password:
debug1: Authentications that can continue: publickey,password,keyboard-interactive
debug1: Authentications that can continue: publickey,password,keyboard-interactive
Connection closed by 10.168.1.2 port 22
分配权限
[root@localhost:~] esxcli system permission list
Principal  Is Group  Role   Role Description
---------  --------  -----  ----------------
dcui          false  Admin  Full access rights
root          false  Admin  Full access rights
[root@localhost:~] esxcli system permission set --help
Usage: esxcli system permission set [cmd options]

Description:
  set                   Set permission for a user or group.

Cmd options:
  -g|--group            Specifies that the supplied ID refers to a group. ESXi local groups are not supported.
  -i|--id=<str>         ID of user or group. Domain users or groups should be specified as "DOMAIN\user_name" or "DOMAIN\group_name".
                        (required)
  -r|--role=<str>       Name of role that specifies user access rights.
                            Admin: Full access rights
                            NoAccess: Used for restricting granted access. E.g. to deny access for some user whose group already has
                        access.
                            ReadOnly: See details of objects, but not make changes
                         (required)
[root@localhost:~]
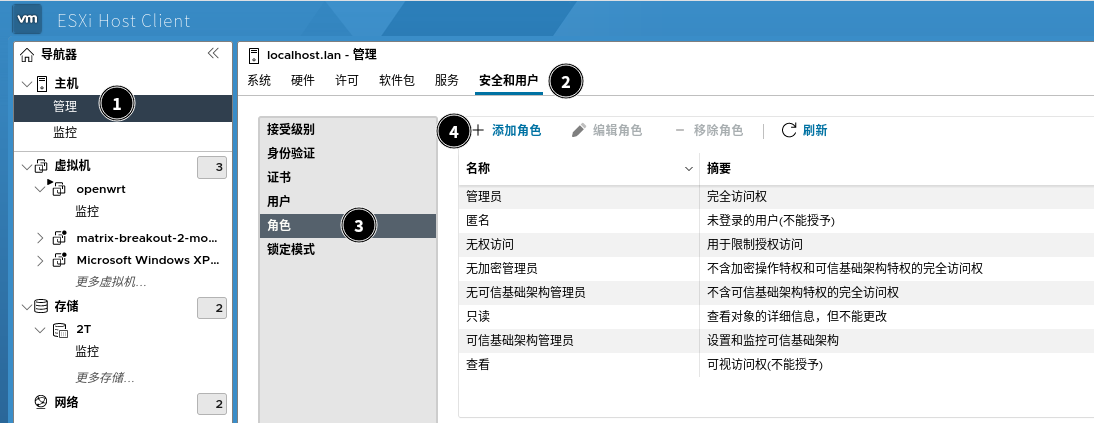
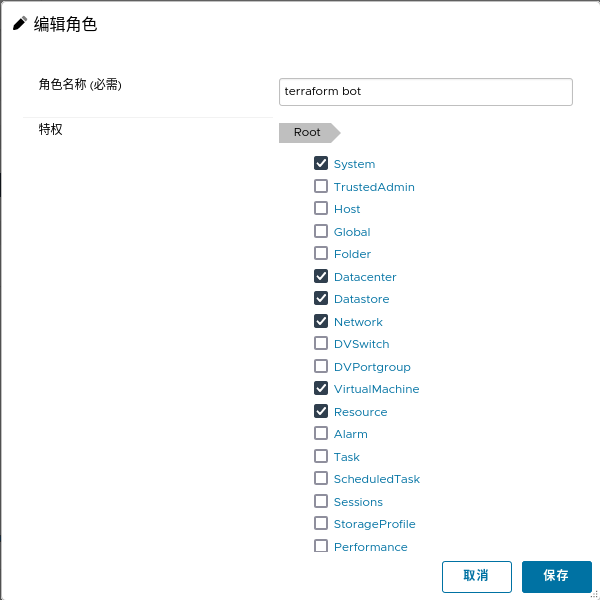
要开的权限 描述 Datacenter 数据中心 Datastore 数据存储 Network 网络 Resource 资源 VirtualMachine 虚拟机 VApp VApp OvfManager OvfManager 操作这里。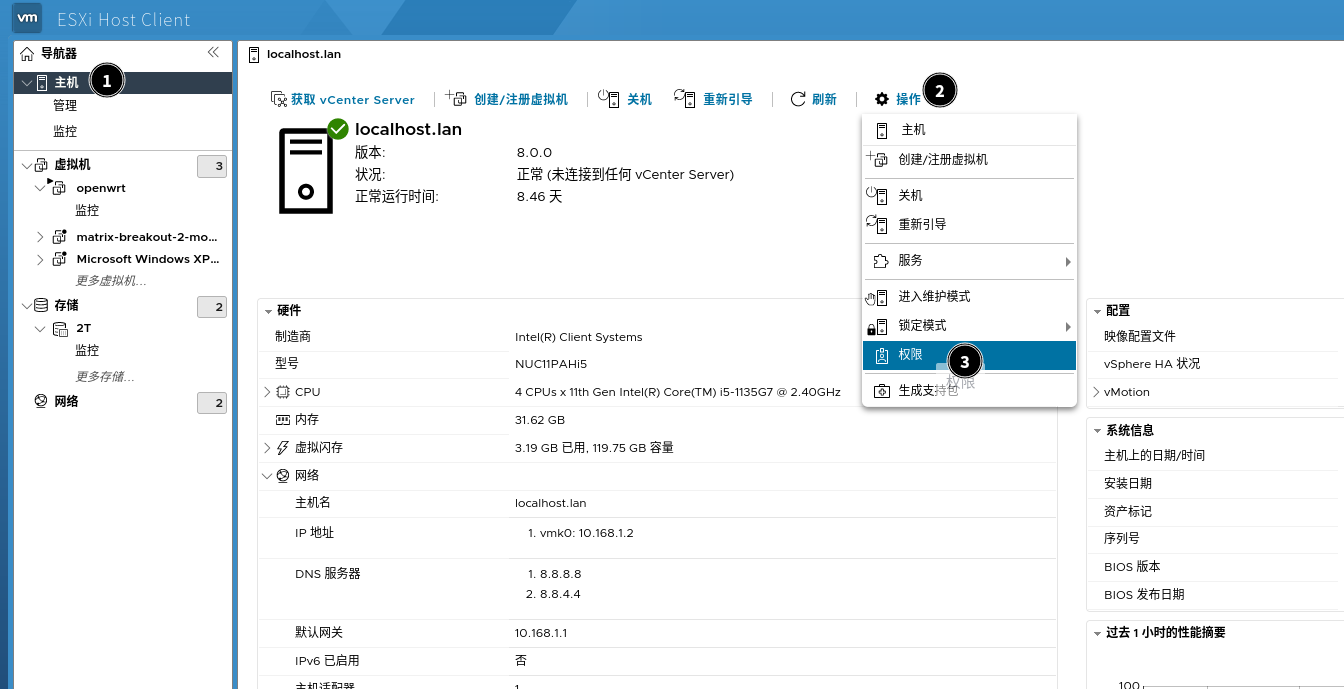
terraform bot分配2T硬盘的使用权限。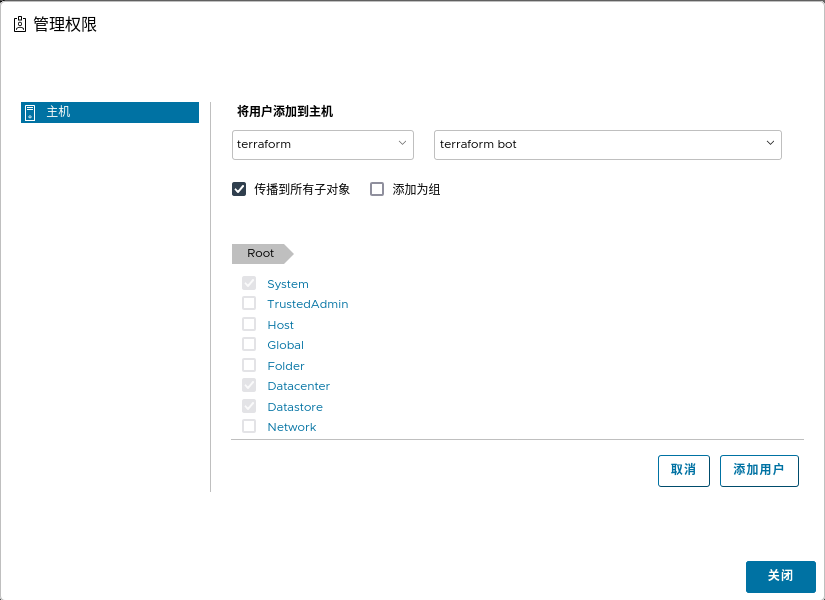
开启SSH
# This file is autogenerated and must not be edited.
+:dcui:ALL
+:root:ALL
+:vpxuser:ALL
-:terraform:ALL
+:terraform:ALL
-:ALL:ALL
[terraform@localhost:~] esxcli system permission list
Principal  Is Group  Role    Role Description
---------  --------  ------  ----------------
dcui          false  Admin   Full access rights
root          false  Admin   Full access rights
terraform     false  Custom  User-defined roles or roles on non-root inventory objects
[terraform@localhost:~]
[terraform@localhost:~] esxcli system permission set -i terraform -r Admin
set failed: Permission to perform this operation was denied.
ovftool批量部署
➜  ~ ovftool  -nw="HostOnly Network" -ds=2T -dm=thin /home/kali-team/matrix-breakout-2-morpheus.ova vi://[email protected]:443/
Enter login information for target vi://10.168.1.2/
Username: terraform
Password: ****************
Opening VI target: vi://[email protected]:443/
Deploying to VI: vi://[email protected]:443/
Transfer Completed
Completed successfully
terrafrom自动安装
➜  deploy_vulnhub ls --tree --icon-theme=unicode
🗁 .
├── 🗋 main.tf
├── 🗋 outputs.tf
├── 🗋 terraform.tfstate
├── 🗋 terraform.tfstate.backup
├── 🗋 variables.tf
└── 🗋 versions.tf
➜  deploy_vulnhub terraform init

Initializing the backend...

Initializing provider plugins...
- Reusing previous version of josenk/esxi from the dependency lock file
- Using previously-installed josenk/esxi v1.10.3

Terraform has been successfully initialized!

You may now begin working with Terraform. Try running "terraform plan" to see
any changes that are required for your infrastructure. All Terraform commands
should now work.

If you ever set or change modules or backend configuration for Terraform,
rerun this command to reinitialize your working directory. If you forget, other
commands will detect it and remind you to do so if necessary.
#########################################
#  ESXI Provider host/login details
#########################################
#
#   Use of variables here to hide/move the variables to a separate file
#
provider "esxi" {
  esxi_hostname = var.esxi_hostname
  esxi_hostport = var.esxi_hostport
  esxi_hostssl  = var.esxi_hostssl
  esxi_username = var.esxi_username
  esxi_password = var.esxi_password
}

resource "esxi_guest" "vulnhub" {
  guest_name = basename(var.ovf_file)
  notes      = basename(var.ovf_file)
  disk_store = var.esxi_datastore

  #
  #  Specify an existing guest to clone, an ovf source, or neither to build a bare-metal guest vm.
  #
  #clone_from_vm      = "Templates/centos7"
  ovf_source = var.ovf_file

  network_interfaces {
    nic_type        = "e1000"
    virtual_network = var.hostonly_network
  }
}
#
#  See https://www.terraform.io/intro/getting-started/variables.html for more details.
#
#  Don't change the variables in this file!
#  Instead, create a terrform.tfvars file to override them.

variable "esxi_hostname" {
  default = "10.168.1.2"
}

variable "esxi_hostport" {
  default = "22"
}

variable "esxi_hostssl" {
  default = "443"
}

variable "esxi_username" {
  default = "terraform"
}

variable "esxi_password" { # Unspecified will prompt
default = "jbDmE#^*9aCXUR"
}

variable "esxi_datastore" {
  default = "2T"
}

variable "vm_network" {
  default = "VM Network"
}

variable "hostonly_network" {
  default = "HostOnly Network"
}

variable "ovf_file" {
  #  A local file downloaded from https://cloud-images.ubuntu.com
  default = "/home/kali-team/matrix-breakout-2-morpheus.ova"

  #  Or specify a remote (url) file
  #default = "https://cloud-images.ubuntu.com/releases/hirsute/release/ubuntu-21.04-server-cloudimg-amd64.ova"
}
参考