搭建rapid7开放dns数据集环境
目录
搭建rapid7开放dns数据集环境 前言
搭建elasticsearch服务
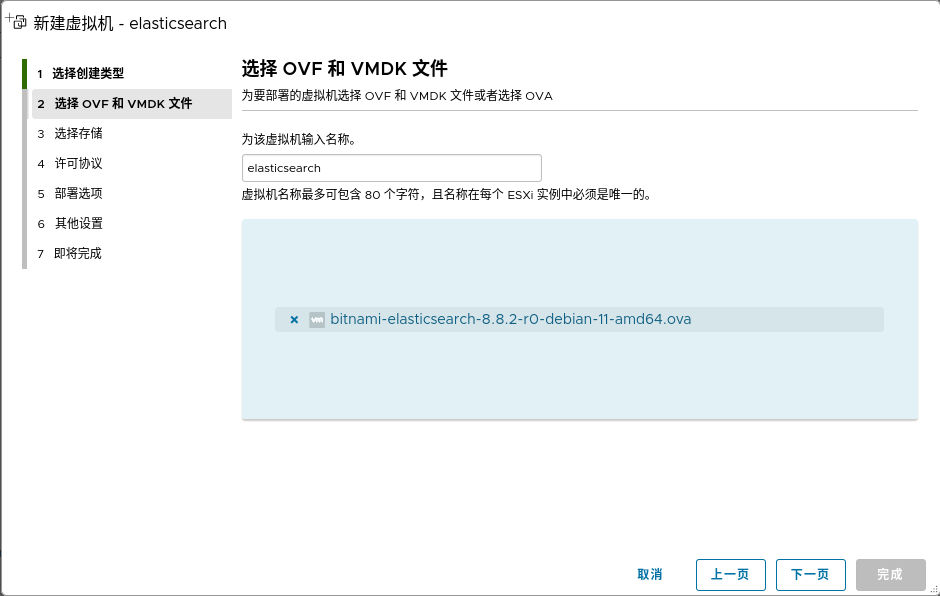
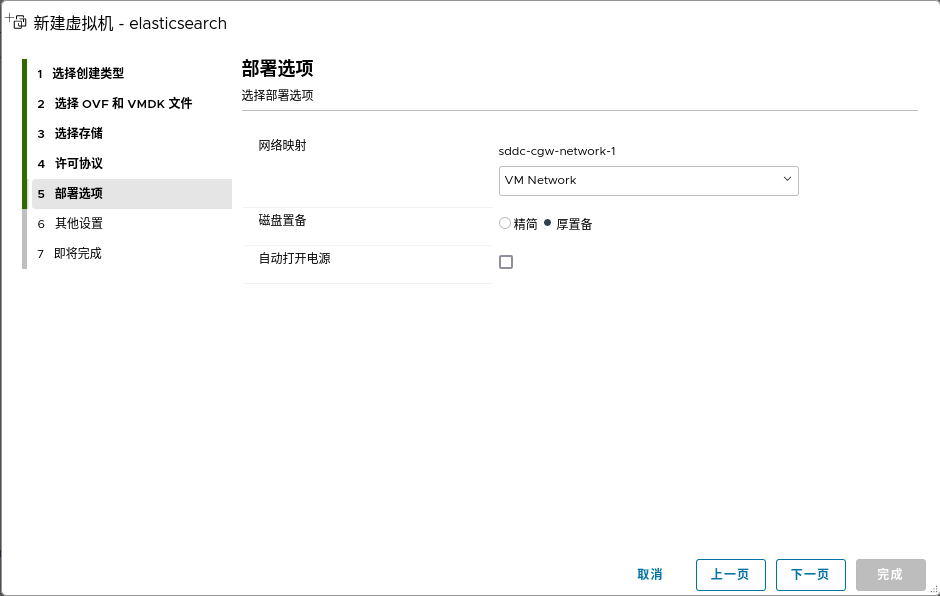
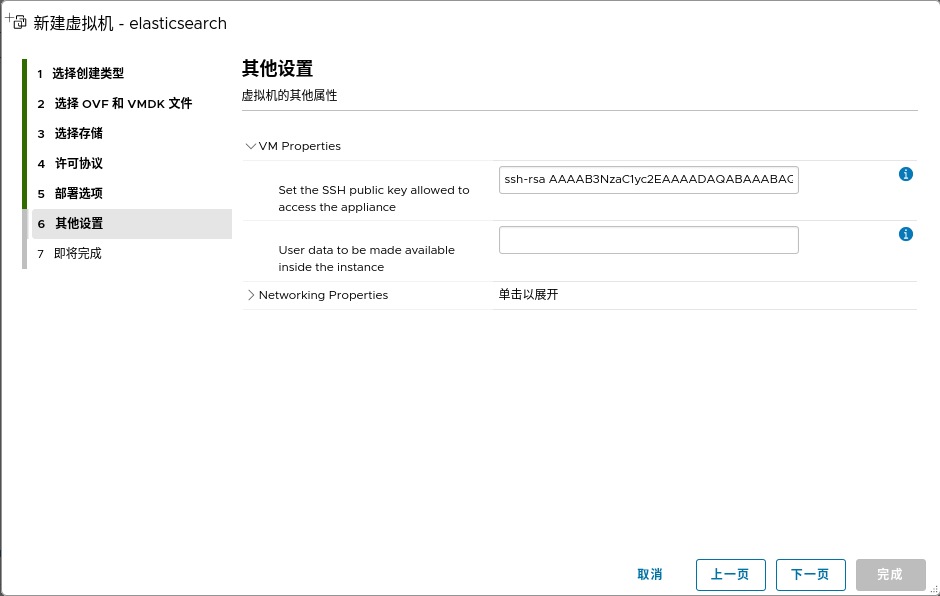
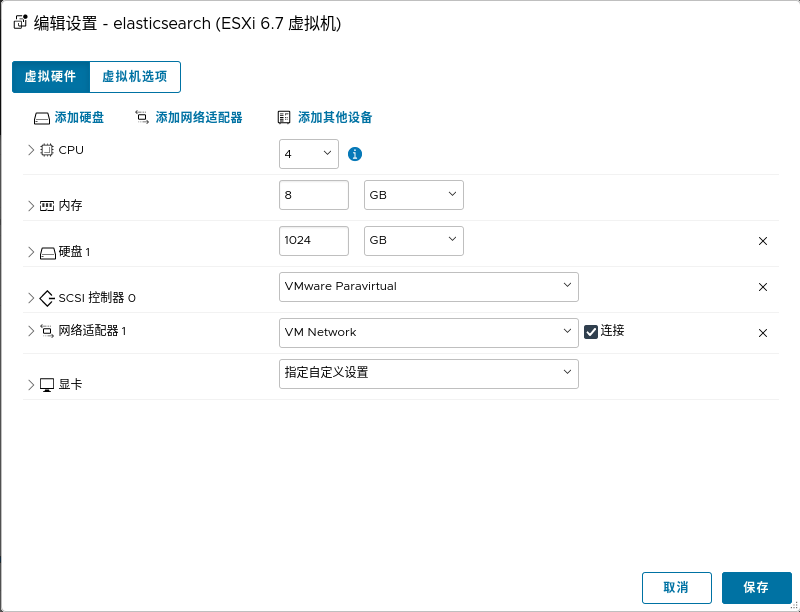
bitnami@debian:~$ passwd bitnami
Changing password for bitnami.
Current password:
New password:
Retype new password:
passwd: password updated successfully
bitnami@debian:~$ curl localhost:9200
{
  "name" : "debian",
  "cluster_name" : "elasticsearch",
  "cluster_uuid" : "U0FGXKwLREmMS-KtR7ksvQ",
  "version" : {
    "number" : "8.8.2",
    "build_flavor" : "default",
    "build_type" : "tar",
    "build_hash" : "98e1271edf932a480e4262a471281f1ee295ce6b",
    "build_date" : "2023-06-26T05:16:16.196344851Z",
    "build_snapshot" : false,
    "lucene_version" : "9.6.0",
    "minimum_wire_compatibility_version" : "7.17.0",
    "minimum_index_compatibility_version" : "7.0.0"
  },
  "tagline" : "You Know, for Search"
}
bitnami@debian:~$
bitnami@debian:~$ free
               total        used        free      shared  buff/cache   available
Mem:         8135672     4620120     3297460         556      218092     3283232
Swap:              0           0           0
对外开放elasticsearch服务(可选&&不推荐)
network字段,将host改成当前IP地址,我这里是10.168.1.211。顺便把下面的xpack.security.enabled也修改成true,方便后面添加密码认证。bitnami@debian:~$ cat /opt/bitnami/elasticsearch/config/elasticsearch.yml
http:
port: "9200"
path:
data: /bitnami/elasticsearch/data
transport:
port: "9300"
action:
destructive_requires_name: "true"
network:
host: 127.0.1.1
publish_host: 127.0.1.1
bind_host: 127.0.0.1
node:
name: debian
discovery:
type: single-node
xpack:
security:
enabled: "false"
ml:
enabled: "false"
ctlscript.sh,restart就可以了。bitnami@debian:~$ sudo vi /opt/bitnami/elasticsearch/config/elasticsearch.yml
bitnami@debian:~$ sudo /opt/bitnami/ctlscript.sh help
usage: /opt/bitnami/ctlscript.sh [command]
/opt/bitnami/ctlscript.sh [command] [service]
Commands:
help show help menu
start start the service(s)
stop stop the service(s)
restart restart or start the service(s)
status show the status of the service(s)
bitnami@debian:~$ sudo /opt/bitnami/ctlscript.sh restart
restarting services...
/etc/nftables.conf,在入网规则将9200端口加入可访问状态,再重新执行一次nft。就可以在其他主机访问了。chain inbound {
# By default, drop all traffic unless it meets a filter
# criteria specified by the rules that follow below.
type filter hook input priority 0; policy drop;
# Allow traffic from established and related packets, drop invalid
ct state vmap { established : accept, related : accept, invalid : drop }
# Allow loopback traffic.
iifname lo accept
# Jump to chain according to layer 3 protocol using a verdict map
meta protocol vmap { ip : jump inbound_ipv4, ip6 : jump inbound_ipv6 }
# Allow selected ports for IPv4 and IPv6.
- tcp dport { 22 } accept
+ tcp dport { 22, 9200 } accept
# Uncomment to enable logging of denied inbound traffic
# log prefix "[nftables] Inbound Denied: " counter drop
}
bitnami@debian:~$ sudo /usr/sbin/nft -f /etc/nftables.conf
设置elasticsearch密码
➜  ~ curl http://10.168.1.211:9200
{
  "name" : "debian",
  "cluster_name" : "elasticsearch",
  "cluster_uuid" : "U0FGXKwLREmMS-KtR7ksvQ",
  "version" : {
    "number" : "8.8.2",
    "build_flavor" : "default",
    "build_type" : "tar",
    "build_hash" : "98e1271edf932a480e4262a471281f1ee295ce6b",
    "build_date" : "2023-06-26T05:16:16.196344851Z",
    "build_snapshot" : false,
    "lucene_version" : "9.6.0",
    "minimum_wire_compatibility_version" : "7.17.0",
    "minimum_index_compatibility_version" : "7.0.0"
  },
  "tagline" : "You Know, for Search"
}
bitnami@debian:/opt/bitnami$ sudo mkdir -p /opt/bitnami/elasticsearch/jdk/bin/
bitnami@debian:/opt/bitnami$ sudo ln -s /opt/bitnami/java/bin/java /opt/bitnami/elasticsearch/jdk/bin/java
bitnami@debian:/opt/bitnami/elasticsearch/bin$ sudo ./elasticsearch-setup-passwords interactive
******************************************************************************
Note: The 'elasticsearch-setup-passwords' tool has been deprecated. This       command will be removed in a future release.
******************************************************************************

Initiating the setup of passwords for reserved users elastic,apm_system,kibana,kibana_system,logstash_system,beats_system,remote_monitoring_user.
You will be prompted to enter passwords as the process progresses.
Please confirm that you would like to continue [y/N]y

Enter password for [elastic]:
Reenter password for [elastic]:
Enter password for [apm_system]:
Reenter password for [apm_system]:
Enter password for [kibana_system]:
Reenter password for [kibana_system]:
Enter password for [logstash_system]:
Reenter password for [logstash_system]:
Enter password for [beats_system]:
Reenter password for [beats_system]:
Enter password for [remote_monitoring_user]:
Reenter password for [remote_monitoring_user]:
Changed password for user [apm_system]
Changed password for user [kibana_system]
Changed password for user [kibana]
Changed password for user [logstash_system]
Changed password for user [beats_system]
Changed password for user [remote_monitoring_user]
Changed password for user [elastic]
➜  ~ curl http://10.168.1.211:9200 -u elastic:password
{
  "name" : "debian",
  "cluster_name" : "elasticsearch",
  "cluster_uuid" : "U0FGXKwLREmMS-KtR7ksvQ",
  "version" : {
    "number" : "8.8.2",
    "build_flavor" : "default",
    "build_type" : "tar",
    "build_hash" : "98e1271edf932a480e4262a471281f1ee295ce6b",
    "build_date" : "2023-06-26T05:16:16.196344851Z",
    "build_snapshot" : false,
    "lucene_version" : "9.6.0",
    "minimum_wire_compatibility_version" : "7.17.0",
    "minimum_index_compatibility_version" : "7.0.0"
  },
  "tagline" : "You Know, for Search"
}
安装logstash
bitnami@debian:~$ wget -qO - https://artifacts.elastic.co/GPG-KEY-elasticsearch | sudo gpg --dearmor -o /usr/share/keyrings/elastic-keyring.gpg
bitnami@debian:~$ sudo apt-get install apt-transport-https
Reading package lists... Done
Building dependency tree... Done
Reading state information... Done
apt-transport-https is already the newest version (2.2.4).
0 upgraded, 0 newly installed, 0 to remove and 8 not upgraded.
bitnami@debian:~$ echo "deb [signed-by=/usr/share/keyrings/elastic-keyring.gpg] https://artifacts.elastic.co/packages/8.x/apt stable main" | sudo tee -a /etc/apt/sources.list.d/elastic-8.x.list
deb [signed-by=/usr/share/keyrings/elastic-keyring.gpg] https://artifacts.elastic.co/packages/8.x/apt stable main
bitnami@debian:~$ sudo apt-get update && sudo apt-get install logstash
Hit:1 http://security.debian.org/debian-security bullseye-security InRelease
Get:2 https://artifacts.elastic.co/packages/8.x/apt stable InRelease [10.4 kB]
Hit:3 http://http.us.debian.org/debian bullseye InRelease
Get:4 https://artifacts.elastic.co/packages/8.x/apt stable/main amd64 Packages [56.9 kB]
Hit:5 http://http.us.debian.org/debian bullseye-updates InRelease
Fetched 67.3 kB in 1s (59.6 kB/s)
Reading package lists... Done
Reading package lists... Done
Building dependency tree... Done
Reading state information... Done
The following NEW packages will be installed:
  logstash
0 upgraded, 1 newly installed, 0 to remove and 8 not upgraded.
Need to get 346 MB of archives.
After this operation, 602 MB of additional disk space will be used.
Get:1 https://artifacts.elastic.co/packages/8.x/apt stable/main amd64 logstash amd64 1:8.9.0-1 [346 MB]
Fetched 346 MB in 1min 58s (2,939 kB/s)
debconf: delaying package configuration, since apt-utils is not installed
Selecting previously unselected package logstash.
(Reading database ... 21193 files and directories currently installed.)
Preparing to unpack .../logstash_1%3a8.9.0-1_amd64.deb ...
Unpacking logstash (1:8.9.0-1) ...
Setting up logstash (1:8.9.0-1) ...
bitnami@debian:~$ cd /usr/share/logstash
bitnami@debian:/usr/share/logstash$ sudo ./bin/logstash-plugin install logstash-filter-tld
Using bundled JDK: /usr/share/logstash/jdk
Validating logstash-filter-tld
Resolving mixin dependencies
Installing logstash-filter-tld
Installation successful
/usr/share/logstash/vendor/bundle/jruby/2.6.0/gems/public_suffix-3.1.1/data
bitnami@debian:/usr/share/logstash$ sudo bin/logstash -e 'input { stdin {} } output { stdout {} }'
Using bundled JDK: /usr/share/logstash/jdk
[INFO ] 2023-08-03 05:49:47.141 [Api Webserver] agent - Successfully started Logstash API endpoint {:port=>9600, :ssl_enabled=>false}
[INFO ] 2023-08-03 05:49:47.243 [Converge PipelineAction::Create<main>] Reflections - Reflections took 54 ms to scan 1 urls, producing 132 keys and
 464 values
[INFO ] 2023-08-03 05:49:47.334 [Converge PipelineAction::Create<main>] javapipeline - Pipeline `main` is configured with `pipeline.ecs_compatibili
ty: v8` setting. All plugins in this pipeline will default to `ecs_compatibility => v8` unless explicitly configured otherwise.
[INFO ] 2023-08-03 05:49:47.352 [[main]-pipeline-manager] javapipeline - Starting pipeline {:pipeline_id=>"main", "pipeline.workers"=>4, "pipeline.
batch.size"=>125, "pipeline.batch.delay"=>50, "pipeline.max_inflight"=>500, "pipeline.sources"=>["config string"], :thread=>"#<Thread:0x7acfec0d@/u
sr/share/logstash/logstash-core/lib/logstash/java_pipeline.rb:134 run>"}
[INFO ] 2023-08-03 05:49:47.616 [[main]-pipeline-manager] javapipeline - Pipeline Java execution initialization time {"seconds"=>0.26}
[INFO ] 2023-08-03 05:49:47.630 [[main]-pipeline-manager] javapipeline - Pipeline started {"pipeline.id"=>"main"}
The stdin plugin is now waiting for input:
[INFO ] 2023-08-03 05:49:47.638 [Agent thread] agent - Pipelines running {:count=>1, :running_pipelines=>[:main], :non_running_pipelines=>[]}
hi
{
         "event" => {
        "original" => "hi"
    },
    "@timestamp" => 2023-08-03T05:49:50.804958539Z,
          "host" => {
        "hostname" => "debian"
    },
       "message" => "hi",
      "@version" => "1"
}
^C[WARN ] 2023-08-03 05:49:57.973 [SIGINT handler] runner - SIGINT received. Shutting down.
[INFO ] 2023-08-03 05:49:58.054 [[main]-pipeline-manager] javapipeline - Pipeline terminated {"pipeline.id"=>"main"}
[INFO ] 2023-08-03 05:49:58.983 [Converge PipelineAction::StopAndDelete<main>] pipelinesregistry - Removed pipeline from registry successfully {:pipeline_id=>:main}
[INFO ] 2023-08-03 05:49:58.986 [LogStash::Runner] runner - Logstash shut down.
rapid7 dns数据集结构
bitnami@debian:~$ pigz -dc 2020-02-21-1582243548-fdns_any.json.gz |head -n1 | pigz > test.json.gz
bitnami@debian:~$ pigz -dc test.json.gz
{"timestamp":"1582243897","name":"0.af.3ca9.ip4.static.sl-reverse.com","type":"a","value":"169.60.175.0"}
字段 描述 样例 name 域名 0.af.3ca9.ip4.static.sl-reverse.com type DNS解析记录类型 a,cname,txt,ns,mx,等等 value 根据上面的类型对应不同的值 169.60.175.0 timestamp 更新UNIX时间戳 1582243897 sudo bin/logstash -f /home/bitnami/logstash.conf,后面的文件路径是配置文件,也就将下面内容保存到logstash.conf文件。input {
generator {
count => 1
message => '{"timestamp":"1582243897","name":"0.af.3ca9.ip4.static.sl-reverse.com","type":"a","value":"169.60.175.0"}'
codec => json_lines {
charset => "UTF-8"
}
}
}
filter {
}
output {
stdout {
codec => rubydebug {
}
}
}
bitnami@debian:/usr/share/logstash$ sudo bin/logstash -f /home/bitnami/logstash.conf
{
          "name" => "0.af.3ca9.ip4.static.sl-reverse.com",
          "type" => "a",
    "@timestamp" => 2023-08-03T06:16:34.884998329Z,
      "@version" => "1",
     "timestamp" => "1582243897",
         "value" => "169.60.175.0",
          "host" => {
        "name" => "debian"
    }
}
使用logstash导入数据
input {
    stdin {
        codec => json {

        }
    }
}
filter {
    tld {
        source => "name"
    }
    date {
        locale => "zh-CN"
        timezone => "Asia/Shanghai"
        match => ["timestamp","UNIX"]
        target => "timestamp"
    }
    mutate {
        add_field => {
            "[@metadata][index]" => "%{[tld][tld]}"
            "domain" => "%{[tld][domain]}"
        }
        remove_field => ["event","@timestamp","host","@version","tld"]
    }
}
output {
    elasticsearch {
        document_id => "%{name}"
        hosts => ["http://localhost"]
        user => "elastic"
        password => "password"
        index => "rapid7_fdns_%{[@metadata][index]}"
        template => "/home/bitnami/rapid7_fdns.json"
        template_overwrite => "true"
    }
}
tld作为elasticsearch的index索引,把没用的字段删除掉。rapid7_fdns_开头拼接tld,因为我创建了一个索引模板绑定了这个正则表达式。模板内容如下:/home/bitnami/rapid7_fdns.json{
"index_patterns": ["rapid7_fdns_*"],
"template": {
"settings": {
"index": {
"number_of_shards": 1,
"max_result_window": "100000",
"number_of_replicas": 0
}
},
"mappings": {
"properties": {
"domain": {
"type": "keyword"
},
"name": {
"type": "text",
"fields": {
"keyword": {
"type": "keyword"
}
}
},
"timestamp": {
"type": "date"
},
"type": {
"type": "keyword"
},
"value": {
"type": "text",
"fields": {
"keyword": {
"type": "keyword"
}
}
}
}
}
},
"priority": 51,
"version": 1,
"_meta": {
"description": "rapid7_fdns"
}
}
索引模板说明
	"_source": {
		"name": "0.red-80-34-227.staticip.rima-tde.net",
		"type": "a",
		"value": "80.34.227.0",
		"timestamp": "2020-02-21T00:10:52.000Z",
		"domain": "rima-tde.net"
	}
tyep和domain字段在搜索的时候都是完全精准匹配的,也不用分词,所以类型为:keyword,其他的正常分词。模板如下: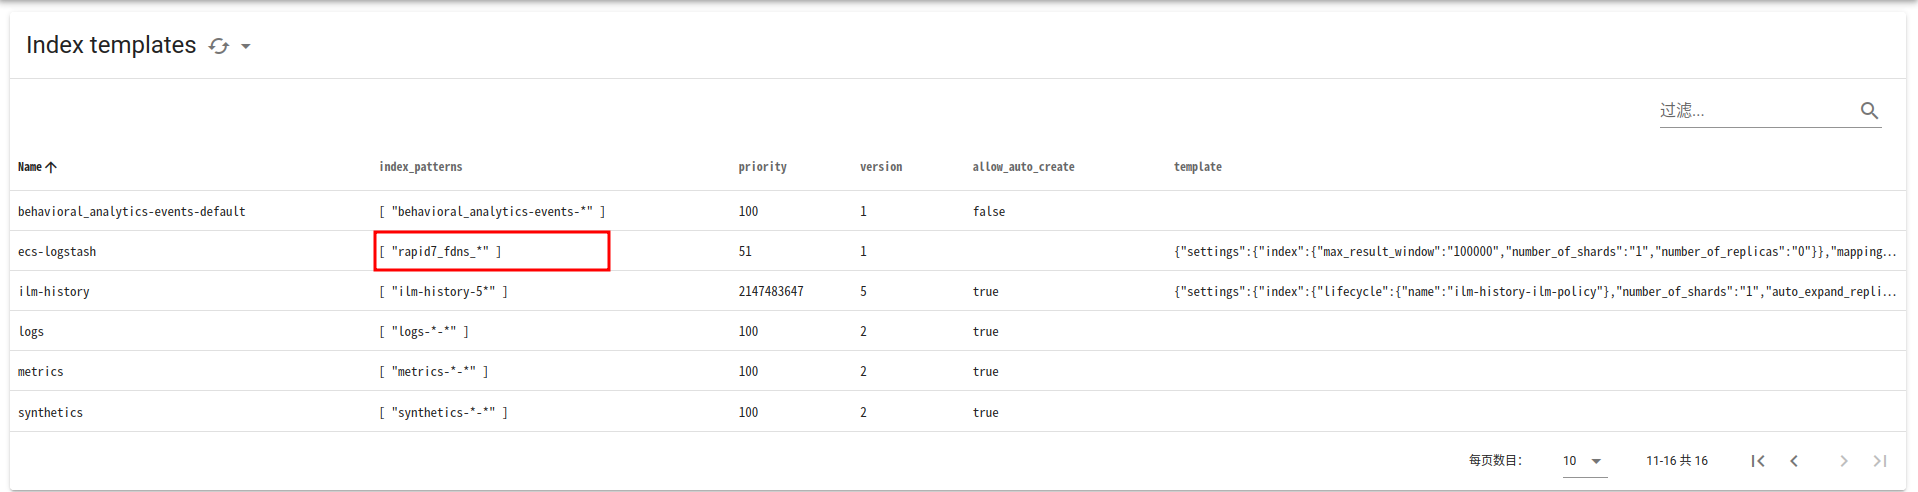
tyep和domain字段精准搜索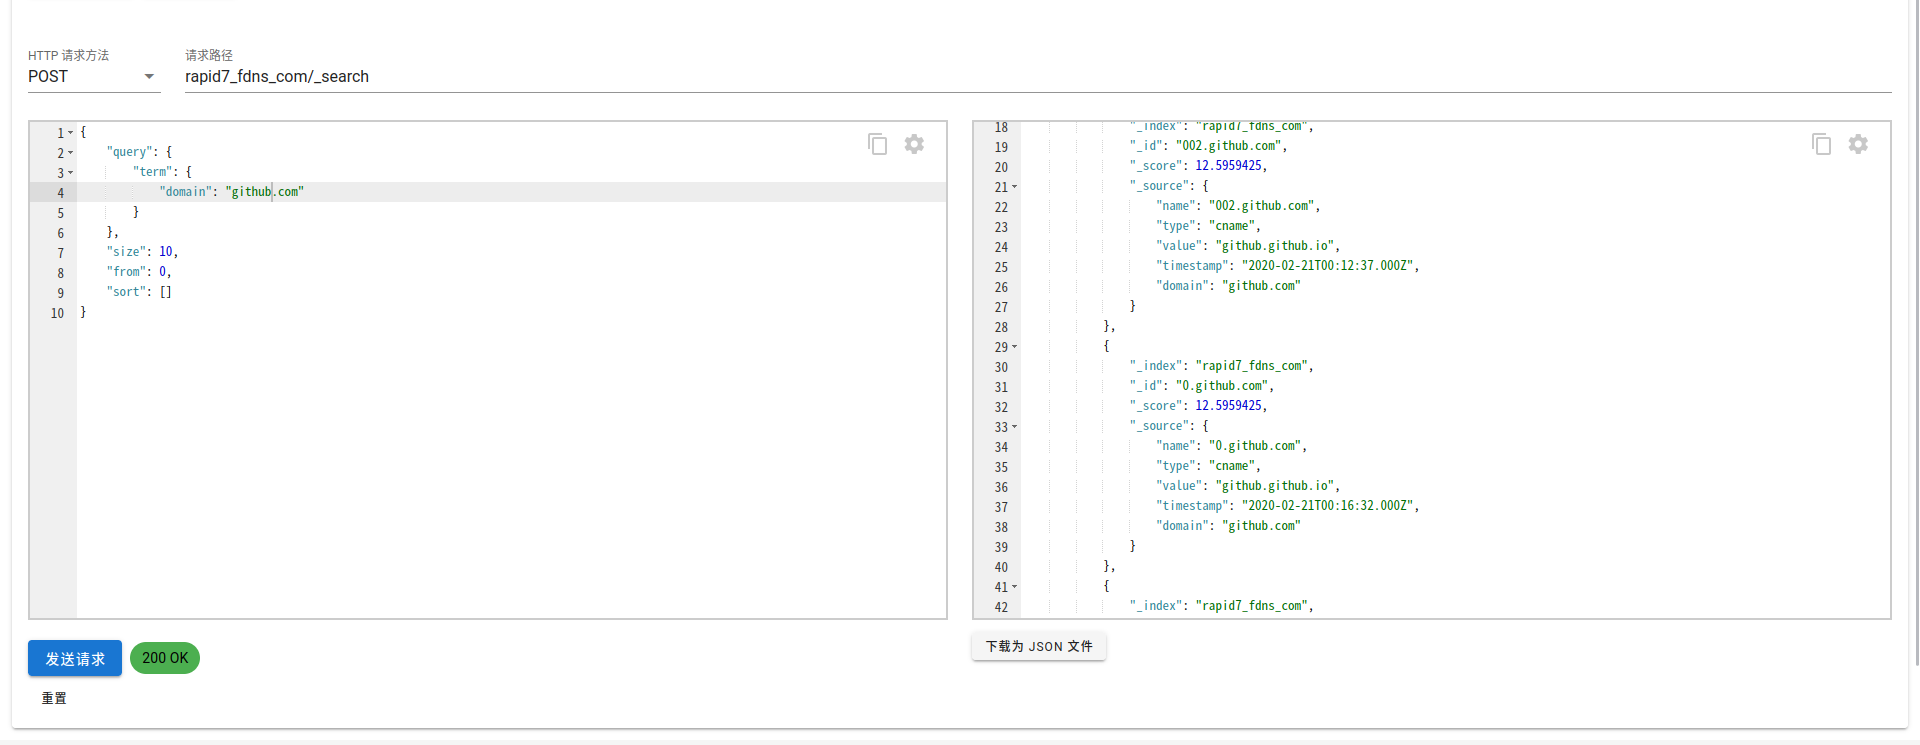
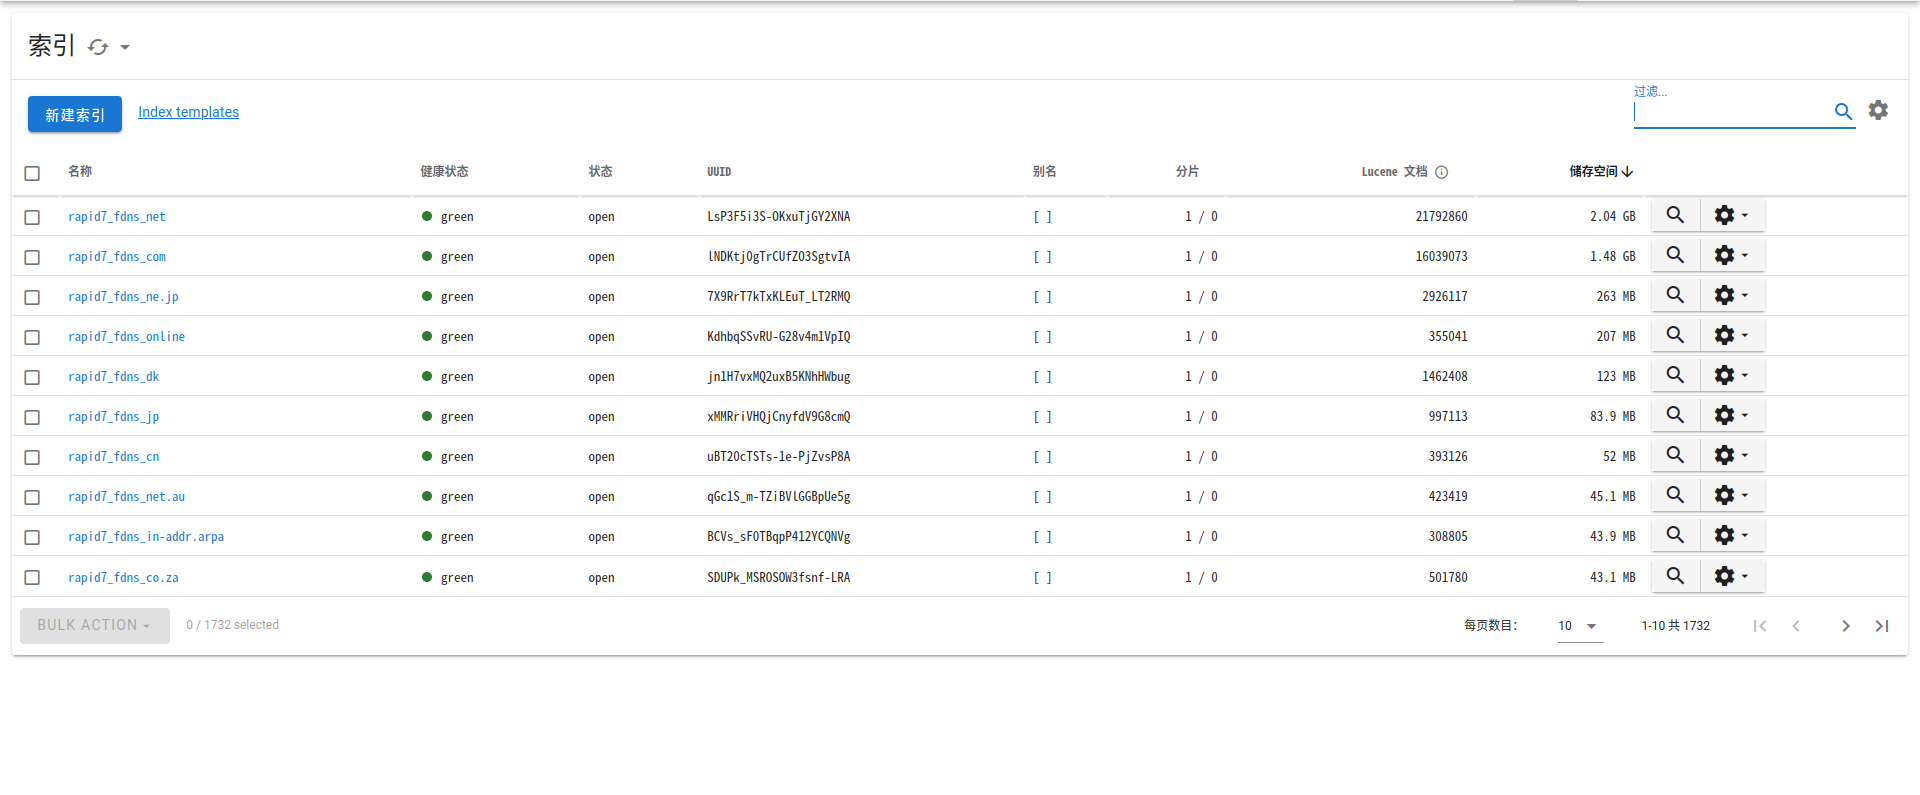
导入结果
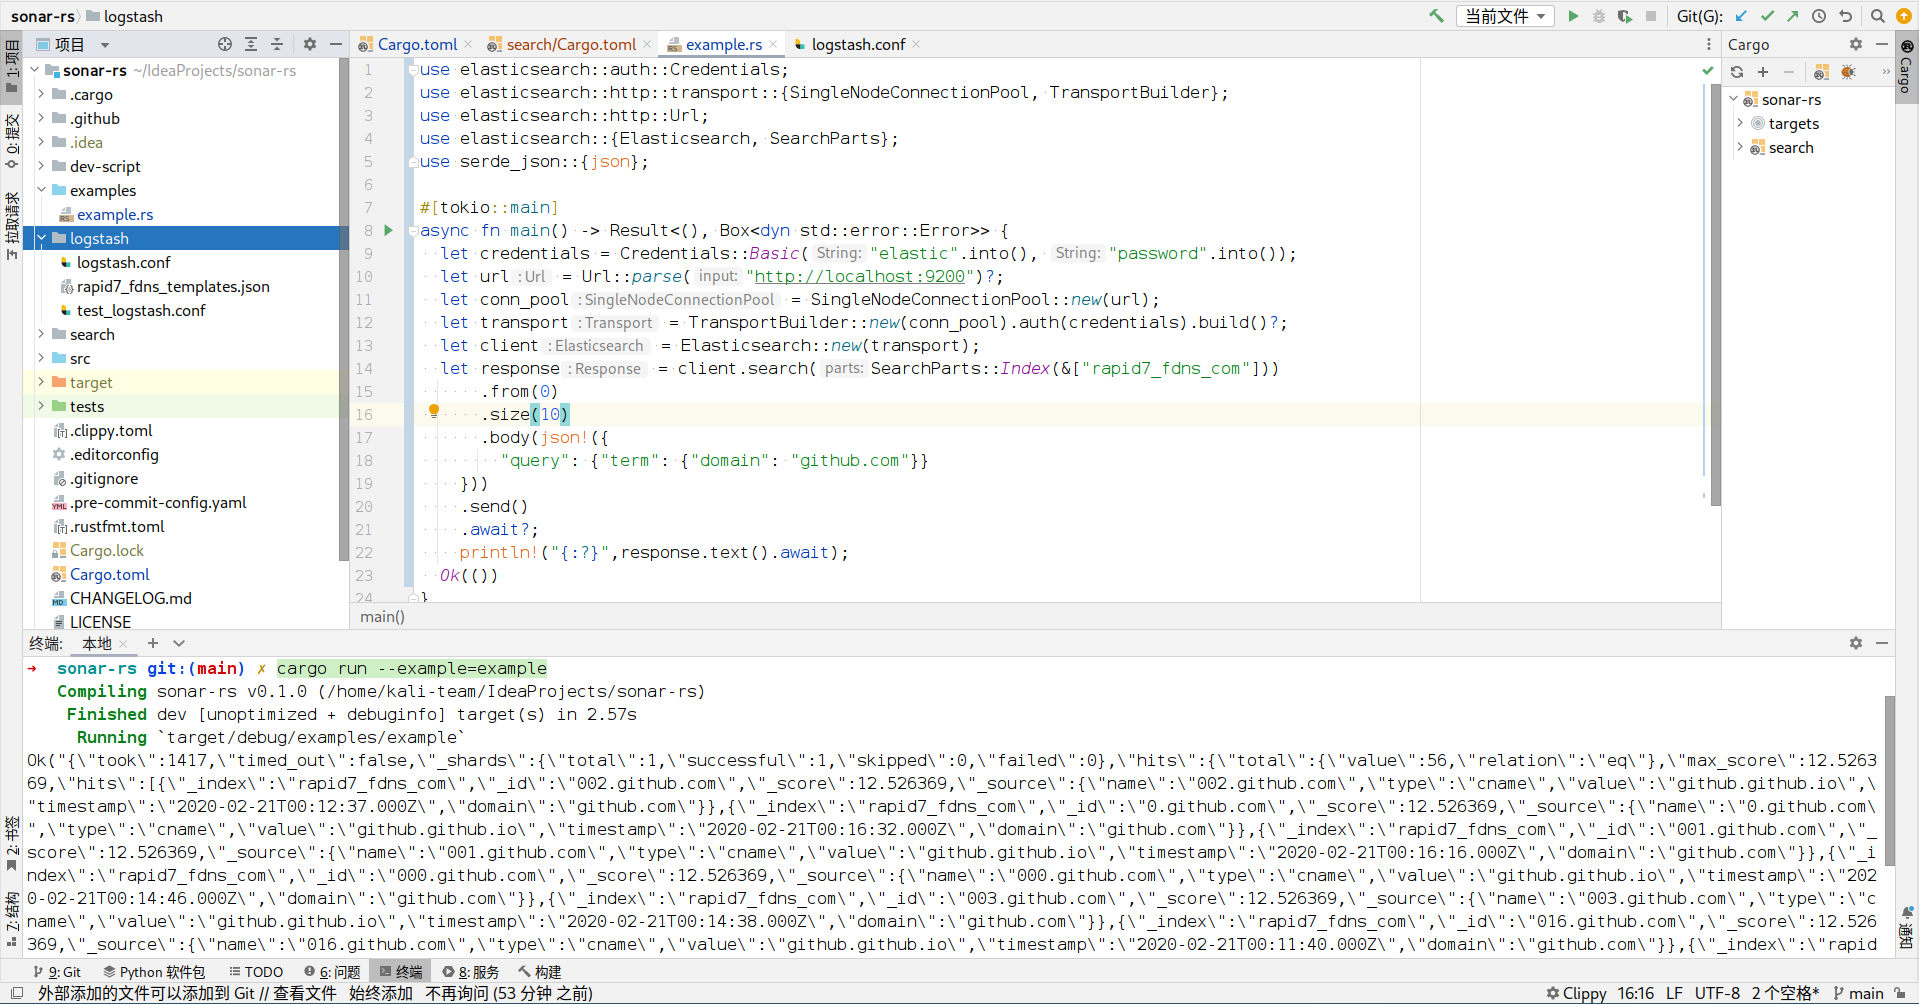
后端搜索逻辑
suffix作和前缀rapid7_fdns_拼接而成,所以这里要用到https://github.com/emo-cat/tldextract-rs对搜索的域名进行解析,例如搜索kali-team.cn,会将域名解析后得到suffix为cn,elasticsearch的索引就是rapid7_fdns_cn,搜索请求为:➜ ~ curl 'http://localhost:9200/rapid7_fdns_cn/_search' -X POST -u elastic:password -H 'Content-Type: application/json' --data-raw $'{\n\x09"query": {\n\x09\x09"term": {\n\x09\x09\x09"domain": "kali-team.cn"\n\x09\x09}\n\x09},\n\x09"size": 10,\n\x09"from": 0,\n\x09"sort": []\n}'
use elasticsearch::auth::Credentials;
use elasticsearch::http::transport::{SingleNodeConnectionPool, TransportBuilder};
use elasticsearch::http::Url;
use elasticsearch::{Elasticsearch, SearchParts};
use serde_json::{json};

#[tokio::main]
async fn main() -> Result<(), Box<dyn std::error::Error>> {
  let credentials = Credentials::Basic("elastic".into(), "password".into());
  let url = Url::parse("http://localhost:9200")?;
  let conn_pool = SingleNodeConnectionPool::new(url);
  let transport = TransportBuilder::new(conn_pool).auth(credentials).build()?;
  let client = Elasticsearch::new(transport);
  let response = client.search(SearchParts::Index(&["rapid7_fdns_com"]))
      .from(0)
      .size(10)
      .body(json!({
        "query": {"term": {"domain": "github.com"}}
    }))
    .send()
    .await?;
    println!("{:?}",response.text().await);
  Ok(())
}
其他
➜ ~ curl "http://localhost:9200/_cat/indices?format=json" -u elastic:password |jq -r ".[].index"|while read line; do curl -X DELETE http://localhost:9200/$line -u elastic:password; done
{
	"persistent": {
		"cluster.max_shards_per_node": "8192"
	}
}
附件
参考